13
Sep
How to Acid Stain a Concrete Floor
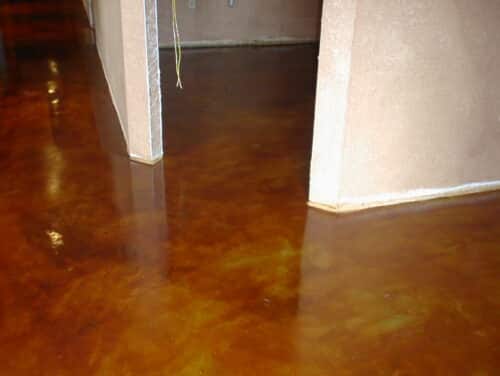
Acid stain isn't paint. It's a chemical reaction. The stain penetrates your concrete and reacts with the minerals inside the slab, creating rich, translucent color that won't chip, peel, or fade. Every floor comes out different because every slab has a different mineral makeup — that's what gives acid-stained concrete its one-of-a-kind, marbled look. It's one of the most affordable ways to transform a plain concrete floor into something that looks like natural stone. And you can do it yourself. Basements, garages, patios, restaurants, offices — acid stain works on all of them. Below is our complete process. We've shipped thousands of acid stain orders and helped customers troubleshoot every kind of floor. This is the method that works.What You'll Need
Gather everything before you start. You don't want to stop mid-stain to run to the store.- Safety gear: Gloves, eye protection, respirator. Acid stain is a chemical product — treat it with respect.
- Surface prep: Concrete DNA Satellite pad (30 grit), low-speed floor buffer, black cleaning pad.
- Cleaner: Super Blue (diluted 1:9 with water). This opens up the concrete pores safely — no muriatic acid needed.
- Degreaser (if needed): Citra Pro for oil and grease stains.
- Acid stain: Pick your color. We carry 13 shades, from earthy browns and tans to greens, blues, and black. Not sure which one? Grab a sample kit and test on your actual concrete first.
- Plastic pump sprayer: A cheap one-gallon sprayer works fine. Must be all-plastic — metal parts will corrode.
- Repair product (if needed): Our Instant Medic – Hard is a cementitious repair product for cracks and spalls. These products accept stain, but they'll stain a different shade than the surrounding concrete.
- Sealer (interior): Super Prime as base coat + WB Urethane (Gloss or Matte) as topcoat.
- Sealer (exterior): Crete Seal Plus EXT in Gloss or Matte.
- Tape and masking: Painter's tape and plastic sheeting to protect walls and adjacent surfaces.
- Squeegee and wet/dry vac: For removing water during prep.
Coverage
Plan on 150–300 square feet per gallon of acid stain, depending on how porous your concrete is and how heavy you apply. Rough, broom-finished concrete soaks up more stain. Smooth, troweled concrete uses less. For a 400 sq ft garage floor, figure on 1.5–2 gallons to be safe. If you're doing a second coat for deeper color, double that.Step 1: Clean and Repair the Floor
This is where most people cut corners. Don't. If there's anything between the stain and the concrete — old sealer, paint, oil, dust, drywall mud — the stain can't react with the slab. You'll get dead spots. Start by removing any coatings, adhesives, or visible contaminants. Use Citra Pro for grease and oil stains. For general cleaning, run a black cleaning pad on a low-speed floor buffer with water. Fill any cracks or spalls with a cementitious repair product like our Instant Medic – Hard before you stain. Just know that repaired areas will react differently and show a slightly different color. That's normal. Important: Do NOT use muriatic acid to clean the floor. It burns the concrete and strips out the minerals the stain needs to react. Use Super Blue instead — it's a safe alternative that opens up the pores without damaging the surface.Step 2: Profile the Surface
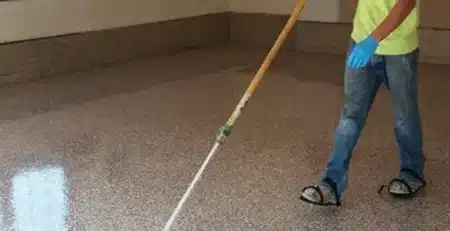
This is the step most tutorials skip, and it's one of the most important. You need to create a surface profile (called a CSP — Concrete Surface Profile) for two reasons: so the stain can penetrate the concrete, and more importantly, so the sealer bonds properly and doesn't peel later. For interior concrete: Run a Concrete DNA Satellite pad (30 grit) under a low-speed floor buffer with plenty of water. Add Super Blue diluted 1:9 with water to help open the concrete. After cleaning with Super Blue, do a rinse pass with just clean water to remove any residual cleaner. Squeegee and vac up the water. For exterior concrete: Outside slabs are usually more porous and broom-finished already. A diluted application of Super Blue followed by a thorough water rinse is typically enough. Let the floor dry until the surface appears dry before moving to the next step. Lightly mop to catch any remaining dust or footprints.Step 3: Mask Off Your Work Area
Tape and mask anything you don't want stained. Walls, baseboards, door frames, adjacent flooring — acid stain will color anything it touches. Use painter's tape and plastic sheeting. If you're working indoors, open windows or run fans for ventilation.Step 4: Apply the Acid Stain
Put the stain in your plastic pump sprayer. Before you spray the floor, test the pattern on a piece of cardboard or an inconspicuous spot to make sure the spray is doing what you want. Spray the stain onto the floor, making sure you get 100% coverage. Keep your spray movements evenly erratic — you don't want a consistent back-and-forth pattern because the stain will dry looking exactly like your motions. Random, overlapping circular movements look the most natural. You can also brush the stain around with a broom or even blow it with a blower to create decorative effects. Remember: this is a reactive stain, so your movements directly affect the final look. Let the stain dry completely. When it's dry, it's done reacting — typically 2–8 hours depending on temperature, humidity, and your concrete. Want a darker result? Apply a second coat after the first is dry. Pro tip: Do a small mock-up area before committing to the whole floor. Every slab reacts differently. A test patch lets you check the color intensity and adjust your technique before you're locked in.Step 5: Rinse and Remove Residue
After the stain has finished reacting, you'll see a chalky residue on the surface. This is normal — it's a byproduct of the chemical reaction. Thoroughly rinse the floor with water and wet mop to remove all residue. Use plenty of water and make multiple passes. You can add a little baking soda to the rinse water if you want, but our acid stain doesn't require formal neutralization. The key is to keep rinsing until there's no chalky film left. Do NOT seal over residue. If you trap that chalky layer under the sealer, it'll cause adhesion problems.Step 6: Seal the Floor
Let the floor dry completely — at least 24 hours, preferably overnight. Moisture from prep and rinsing needs to be fully out of the concrete before you seal. If you trap moisture under the sealer, it can cloud or blister. For interior floors: Apply a coat of Super Prime as your base, then follow with WB Urethane (available in Gloss or Matte). The urethane is a 2-component water-based formula with excellent adhesion and durability. Plan on two coats of sealer for an even finish. For exterior projects: Use Crete Seal Plus EXT in your choice of Gloss or Matte. This is an acrylic sealer designed for outdoor exposure. Maintenance: Use EZ Clean as your periodic floor cleaning soap to keep the sealed surface looking good. If you need to protect the floor from construction traffic after sealing, lay down paper — but never tape paper directly to the floor.What to Expect: 2-Day Job Timeline
Here's a realistic schedule for an interior acid stain project. Most jobs wrap up in two days.Day 1
- 8:00 AM – 12:00 PM: Prep the floor with Concrete DNA Satellite pads and clean. This is the longest step — don't rush it.
- 12:00 PM: Apply acid stain.
- 4:00 PM: Clean acid residue and rinse the floor. Let dry overnight.
Day 2
- 8:00 AM: Apply Super Prime (base coat sealer).
- 12:00 PM: Apply WB Urethane (topcoat). Done.
Indoor vs. Outdoor: What's Different?
The stain application itself is the same. The differences are in prep and sealing:- Prep: Interior floors get diamond-pad profiling. Exterior floors are usually porous enough that Super Blue alone handles it.
- Sealer: Interior gets the Super Prime + WB Urethane system for maximum durability and that rich "wet look." Exterior gets Crete Seal Plus EXT, which handles UV, rain, and temperature swings.
- Color choice: Acid stain is actually the better option for outdoor concrete because the color is permanent and part of the slab. It won't chip or peel even with weather exposure. All 13 of our colors work outdoors.